As a digital marketer, the value you can provide is directly tied to your ability to track success. Whether on the paid or organic side of digital marketing, landing page conversion tracking is essential to identifying effective and ineffective channels, messaging, targeting, and more.
Conversion actions can be clearly defined if users make a purchase or submit a lead form that redirects to some type of “Thank You!” confirmation page, but not all are that clear-cut. Some website actions, like pressing a click-to-call button on a mobile device or choosing to “Get Directions” to a brick-and-mortar store location, are valuable to track even though they do not redirect to a new page URL. In these instances, click-triggered conversion events can prove essential to getting the most from digital campaign optimizations.
Google Tag Manager click-triggered conversion events
Google’s Tag Manager provides a user-friendly means to track these kind of click-triggered conversion events. For the purposes of this article, let’s assume you’ve already mastered Google Tag Manager Basics for Beginners and know the Ways Google Tag Manager Will Help Your PPC (or SEO) efforts. Event tracking with this platform is a bit more advanced, so this post will walk through the general setup and troubleshooting of click triggers. In its most basic form, a click trigger can be used to measure anything a user might click on a website or landing page.
Some of the most common reasons to use click triggers include:
- Clicks on a phone number on a mobile website
- Clicks to get directions from Google Maps
- Clicks on a link that redirects to a new domain
- Clicks to submit a form that does not trigger a redirect
This list is not exhaustive by any means. There are countless scenarios in which you might opt for click triggers instead of, or in addition to, URL page views. Whatever the reason, the process for creating and troubleshooting click triggers is very similar.
How does Google treat click triggers?
Before digging into the specifics of creating click triggers in GTM, let’s first clear up a couple of things:
- Click triggers function the same way as any other trigger when firing tags through GTM. Once a click trigger is defined, it can be added to any new or existing tags with no required adjustment to the tag settings.
- Click triggers are not platform-specific in GTM. That is, a single trigger can be used to fire tags through multiple platforms and does not need to be duplicated if the same trigger is used for multiple tags.
How to create a button click trigger in GTM
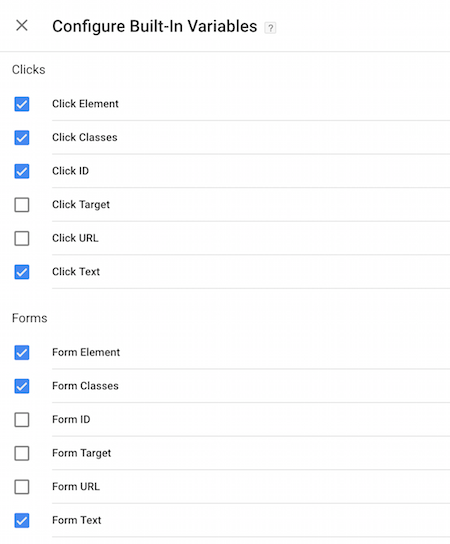
Step 0: Configure Variables
If you are working with a new Tag Manager account, or one which has primarily utilized Page View triggers in the past, some variables may need to be configured before creating click triggers. This can be done by navigating to the Variables section on the left-side menu and clicking CONFIGURE. There, select the variables that will be utilized in your click filter criteria:
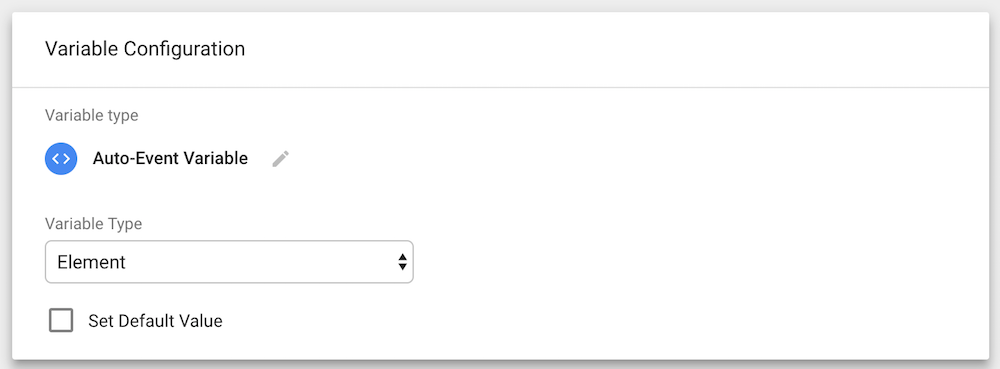
In addition to built-in variables, other custom variables can also be defined in the “User-Defined Variables” module directly below “Built-In Variables.” One custom variable will be shown in examples below is the Auto-Event Variable type “Element.” This variable is useful for targeting page elements which don’t have a defined click- or form ID, class, etc.
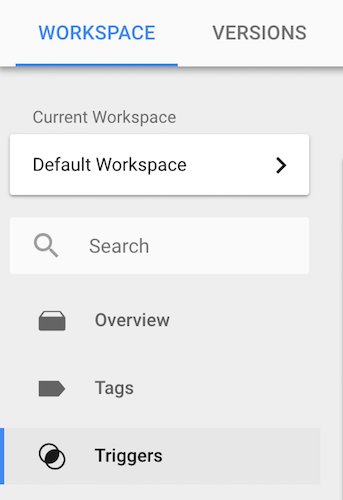
Step 1: Create a new trigger
To start, navigate to the Triggers section of Google Tag Manager (from the left-side navigation) and click the red box to create a new trigger:
Step 2: Choose a trigger type
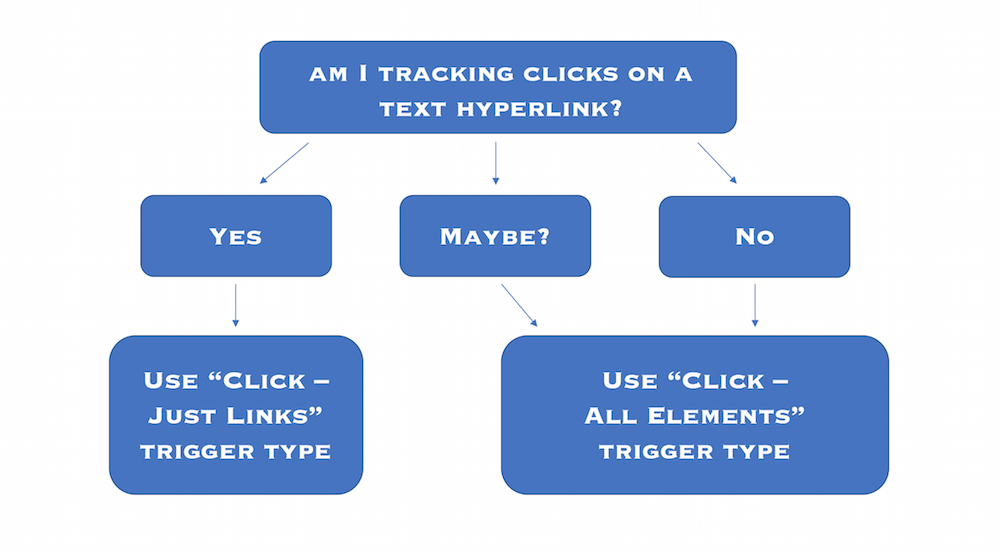
After naming the new trigger, click “Trigger Configuration” to select the trigger type. Page View triggers will be most familiar to those who have used GTM for URL tracking. In this case, simply opt for one of the two types of click triggers: All Elements or Just Links:
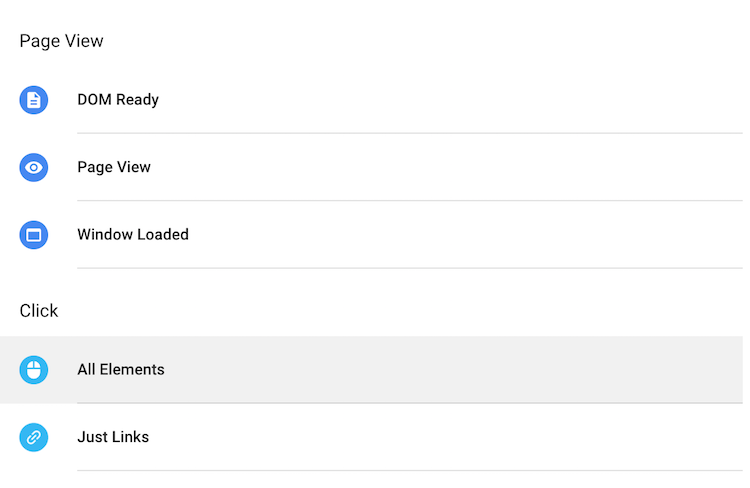
Not sure which trigger type is best for your needs? “All Elements” includes any button, link, image, etc. and is the most frequently used trigger type for click events.
If you’re still unsure, here’s a quick guide:
Step 3: Define the trigger
Very rarely will you want to track ALL clicks on a given page, so establishing stricter criteria is necessary to capture the desired clicks. Choose the “Some Clicks” option to establish those conditions. This is where the variables previously configured will come into play. Let’s examine three ways to use the Element variable configured above.
Example 1: Click-to-Call
If a user visits the website or landing page on their mobile device, it’s valuable to know if they click the displayed phone number to make a call. Hovering over a click-to-call button previews the result in the bottom-left of the window (e.g., tel:4444444444). This is used to define the trigger with the Element variable:
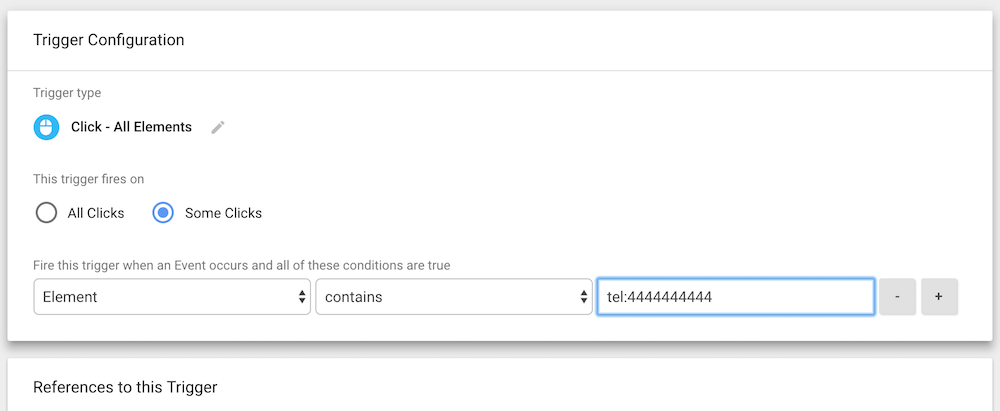
This trigger will activate anytime someone clicks an element on the page that initiates a phone call to the specified number.
Example 2: Links to external site
Some website setups are complex, and there are times when forms need to be hosted on a separate domain from the primary. Ideally, we still want to implement GTM or another means of conversion tracking directly on the form submission page, but tracking the users who click from a landing page to that external site is also valuable. At times, it might even be the closest to conversion tracking you can get initially.
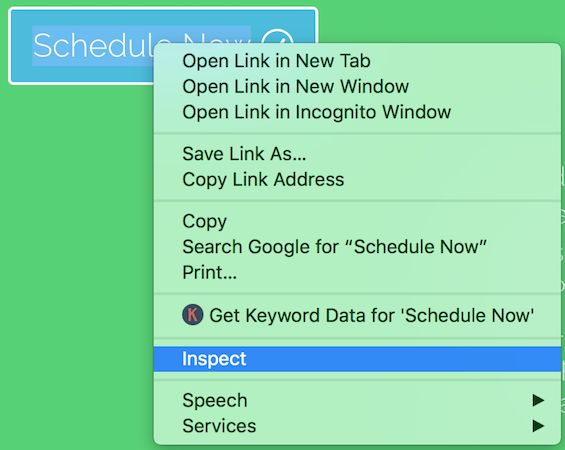
To define this trigger, go to the button that directs to the external page first. Right-click on the button (or other element that links to the external site), and choose “inspect.” This will show the URL destination for button clicks:
Once the link associated with this button is identified, that will define the Element variable criteria:
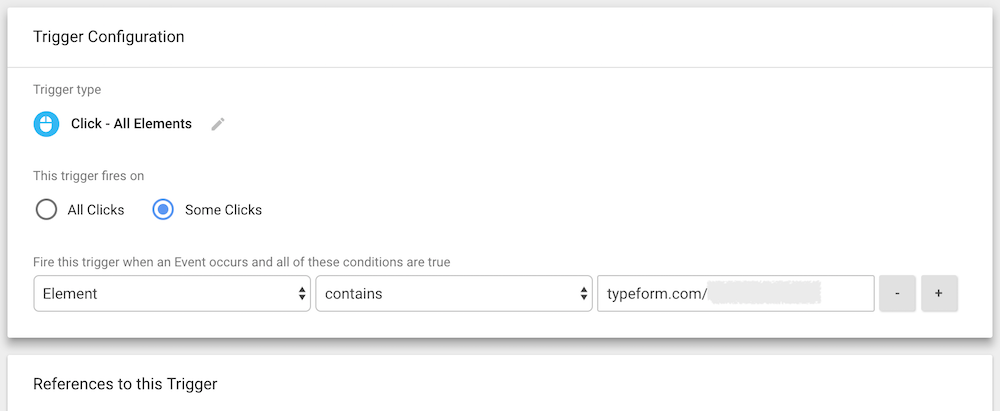
Now, this trigger will fire anytime someone clicks a link or button that redirects to the specified page on the external site.
Example 3: Clicks to get directions
Finally, let’s look at an example with some more specific criteria filters. Consider a company with brick-and-mortar stores and a website that lists addresses with a link to “Get Directions” from Google Maps. The company wants to track clicks on this link, since their data suggests that people who look up directions to the store are more likely to come in and purchase.
However, because there are multiple store locations, “Get Directions” clicks from each store page should be tracked separately. To accomplish this, start with the Click – Just Links trigger type and use Page URL as the first variable. Next, click the “+” next to the first condition to add a second. This second condition is where the Element variable is defined with the Google Maps URL:
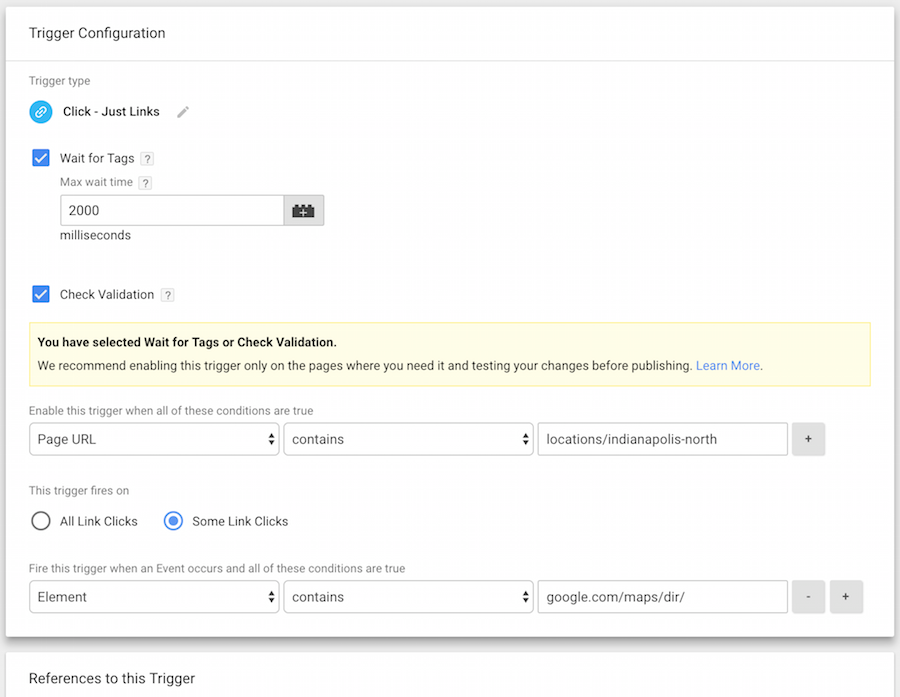
The Clicks – Just Links trigger type, also provides access to some additional settings:
- Wait for Tags: This condition will delay loading of the new page until all tags have fired, or until the “max wait time” is reached. Selecting this ensures that conversions are tracked before the user leaves the page.
- Check Validation: This condition requires that the click register as a valid action (i.e. something actually happens when users click the link). If a user tries to click the link but nothing happens, no conversion is tracked. This condition is useful for preventing multiple conversions being tracked during a single session.
Above are just three examples of how an Element variable can be used to create custom click triggers for common scenarios. Many more advanced combinations exist that allow triggers to be as broad or specific as necessary to accommodate your needs.
How to debug Tag Manager click triggers
When new click triggers are created, it is always best to verify that they are working as intended. To do this, every trigger must be assigned to a Tag. Then, before publishing the GTM changes, preview how they will behave on your live site by clicking the Preview button in the top right of the workspace:

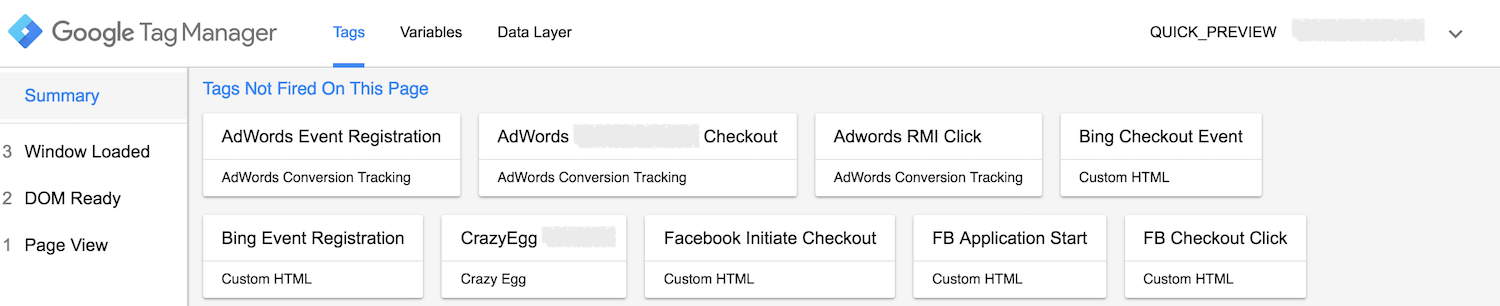
Once Preview is enabled, open your website in the same window (your homepage and every page where you’ve created a new trigger you’d like to test). Upon loading the page, the Analytics Preview bar appears at the bottom of the screen, with a list of tags that were fired (first, below) and not fired with the Page View (second):
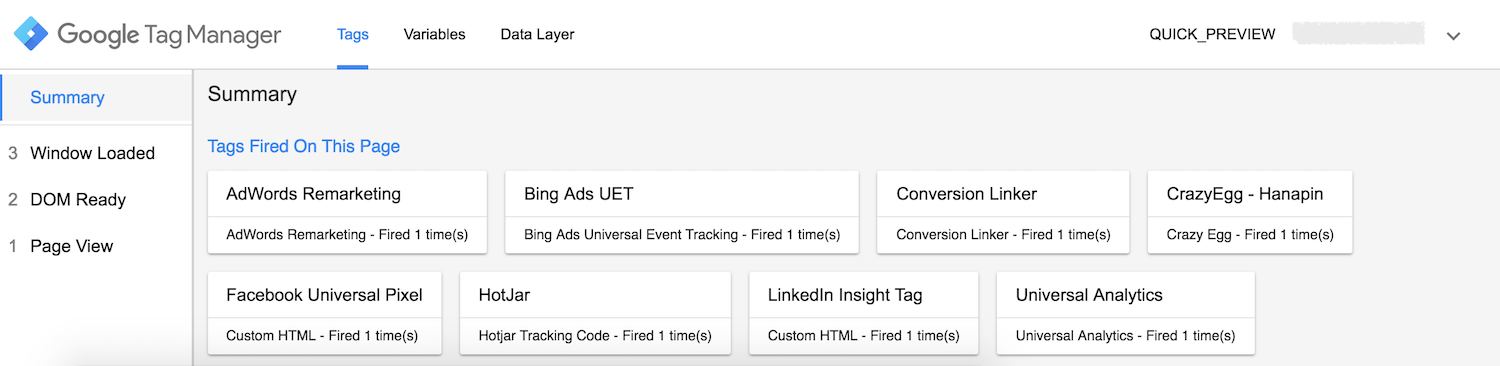
This preview bar updates in real time, so any buttons or links clicked will trigger the associated tags. Remember, if clicks that link to an external site are being tested, holding “control” (PC) or “command” (Mac) while clicking will ensure that the link opens in a new window. The preview bar on the initial page can then be examined after the link is opened.
Ideally, this exercise confirms that all tags are firing correctly. However, two potential errors may still arise:
- A tag is firing when it should not.
- A tag is not firing when it should.
If either of these occur, return to the Google Tag Manager workspace and reexamine the triggers. Look for missed settings, typos in trigger criteria, and double-check that all triggers are tied to the correct Tags. After correcting any errors, return to the Preview windows, reload the pages, and test again.
When all website Tags and Triggers are functioning as desired, return to the GTM workspace and submit changes by clicking the blue Submit button in the top-right. Also, don’t forget to leave the Preview mode before exiting Tag Manager or the preview bar will follow you in all subsequent visits to your website.

Why doesn’t my click trigger fire in Google Tag Manager?
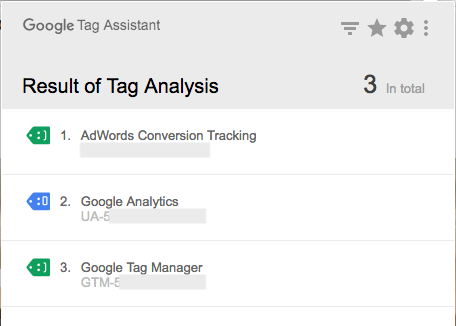
After the GTM changes publish, triple-check that all tags are firing properly by launching the Tag Assistant (by Google) extension in Google Chrome, and opening the website page(s) one more time. This will show if the Tag Manager code is operating correctly, as well as any Google Ads or Analytics codes that have fired from GTM click triggers:
Both the UET Tag Helper (by Bing Ads) and Meta Pixel Helper extensions for Chrome can be used to verify Facebook or Bing Ads tags that have been triggered as well.
If tags are not firing on the live website or landing page as anticipated, return to GTM and check the following:
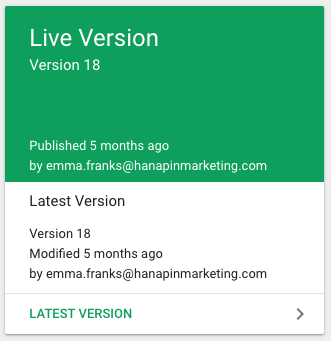
Submit Changes: Be sure that the multi-step process to publish changes made in the GTM workspace was completed successfully. The green “Live Version” box should list the most recent version and publish date. If it’s outdated, new changes have not been fully published.
Tag Setup: After confirming that the most recent version of changes has been published successfully, a persisting problem indicates there may be an issue with your Tag setup. Open the Tag in GTM and the pixel code from the platform to confirm that all elements of the code are copied or transcribed correctly. Since the Triggers were already verified using the Preview pane, misalignment between the pixel code (which Helper extensions look for) and the GTM Tag is the most likely culprit for missing or invisible Tags on the website or landing page.
Closing thoughts about Google Tag Manager triggers
Google Tag Manager is a powerful tool to have in your PPC arsenal. In addition to Page View and other trigger types, mastering the intricacies of click triggers can take some time and exploration. However, it will also yield numerous opportunities for advanced digital strategies. With click triggers, remarketing audiences become more valuable, behavioral analyses become more thorough, and overall understanding of website engagement and attribution becomes clearer.
We invite you to take advantage of this GTM feature to elevate the landing page experience for your visitors and your own digital advertising success.
Get an Instapage 14-day free trial and see how our platform allows you access to a suite of tools to significantly improve your advertising ROI and streamline your process.
Try the world's most advanced landing page platform with a risk-free trial.
